Get a PDF version of this manual
Preamble
Dafne is a program for the segmentation of medical images, specifically MR images, that includes advanced deep learning models for an automatic segmentation. The user has the option of refining the automated results, and the software will learn from the improvements and modify its internal models accordingly. In order to continuously improve the performance, the deep learning modules are stored in a central server location (see section Deep Learning below)
License
Dafne is free software: you can redistribute it and/or modify it under the terms of the GNU General Public License as published by the Free Software Foundation, either version 3 of the License, or (at your option) any later version.
This program is distributed in the hope that it will be useful, but WITHOUT ANY WARRANTY; without even the implied warranty of MERCHANTABILITY or FITNESS FOR A PARTICULAR PURPOSE. See the GNU General Public License for more details.
You should have received a copy of the GNU General Public License along with this program. If not, see http://www.gnu.org/licenses/.
Authorship
Dafne has been developed in a joint effort by the University of Basel, the Basel University Hospital, and the Mondino Foundation. See the About page for detailed authorship information.
The main developers currently are: Francesco Santini, Jakob Wasserthal, and Abramo Agosti. Medical supervision by Anna Pichiecchio.
The project is supported by the Swiss National Science Foundation, Spark Project #CRSK-3_196515
Citing
If you are writing a scientific paper, and you used Dafne for your data evaluation, please cite the following paper:
Santini F, Wasserthal J, Agosti A, et al. Deep Anatomical Federated Network (Dafne): an open client/server framework for the continuous collaborative improvement of deep-learning-based medical image segmentation. 2023 doi: 10.48550/arXiv.2302.06352.
Third-party code
Dafne depends on a number of third-party libraries, released under GPL or compatible licenses. For a full list of dependencies, please refer to the requirements.txt and the README.md files in the github repository.
Download and installation
Dafne is written in pure Python, and is thus multi-platform. The code and the distributable binaries are accessible on Github.
Source installations
Dafne is compatible with Python 3.8+.
Note for source installations
Dafne uses flexidep for advanced control of dependencies. This means that some dependencies will be installed at the first run of this program. Please make sure that you have proper internet access the first time you run Dafne, so that they can be installed. This obviously does not apply for binary installation.
Pip installation
Dafne is available on the PyPi repository. You can install it with
pip install dafne
Dafne should be available for execution from the command line by typing dafne.
Davelopment installation
The Dafne repository can be cloned with the command:
git clone https://github.com/dafne-imaging/dafne.git
It can then be installed in editable mode (for development) with
cd dafne
pip install -e .
Dafne will then be available on the command line as in the pip installation. Alternatively, the dependencies can be installed with
pip install -r requirements.txt
and the program executed with
python dafne
The deep learning management is done in a separate repository, which can also be cloned and installed in editable mode. Do this before installing Dafne dependencies:
git clone https://github.com/dafne-imaging/dafne-dl.git
cd dafne-dl
pip install -e .
Binary installations
Windows 10
In the Github releases page, an installer for Windows generated with PyInstaller and InnoSetup is provided. The installation package is created under Windows 10 version 20H2 and might not work with earlier versions of Windows. Before installing, please make sure that the Visual C Runtime is installed. If unsure, you can download and install it directly from this page (direct link to the installer)
Mac OS binary installation
In the Github releases page, packaged versions for Mac OS (86_x64 packaged under Catalina and amd64 packaged under Ventura) generated with PyInstaller are available. Make sure to download the version corresponding to your architecture! If you are unsure, try the arm64 version first, and if it doesn’t work, try the x86_64 version.
From this release, the Mac version is shipped as a standard (code-signed) Mac application packaged inside a dmg file. Download the dmg file, double-click on it, and copy the “Dafne” App to you Applications folder.
Linux binary installation
Dafne is also released in binary version for Linux. It is packaged as a single-file application with PyInstaller. Just download the appropriate binary file (dafne_linux_<VERSION>), make it executable by running (substitute <VERSION> with the version code, e.g. 1.1-alpha7):
chmod +x dafne_linux_<VERSION>
and run it as any other linux program.
./dafne_linux_<VERSION>
Main interface
The main interface of Dafne is composed of two windows:
- the Toolbox, where the menus and the commands are;
- the Image Window, where the dataset is visualized.
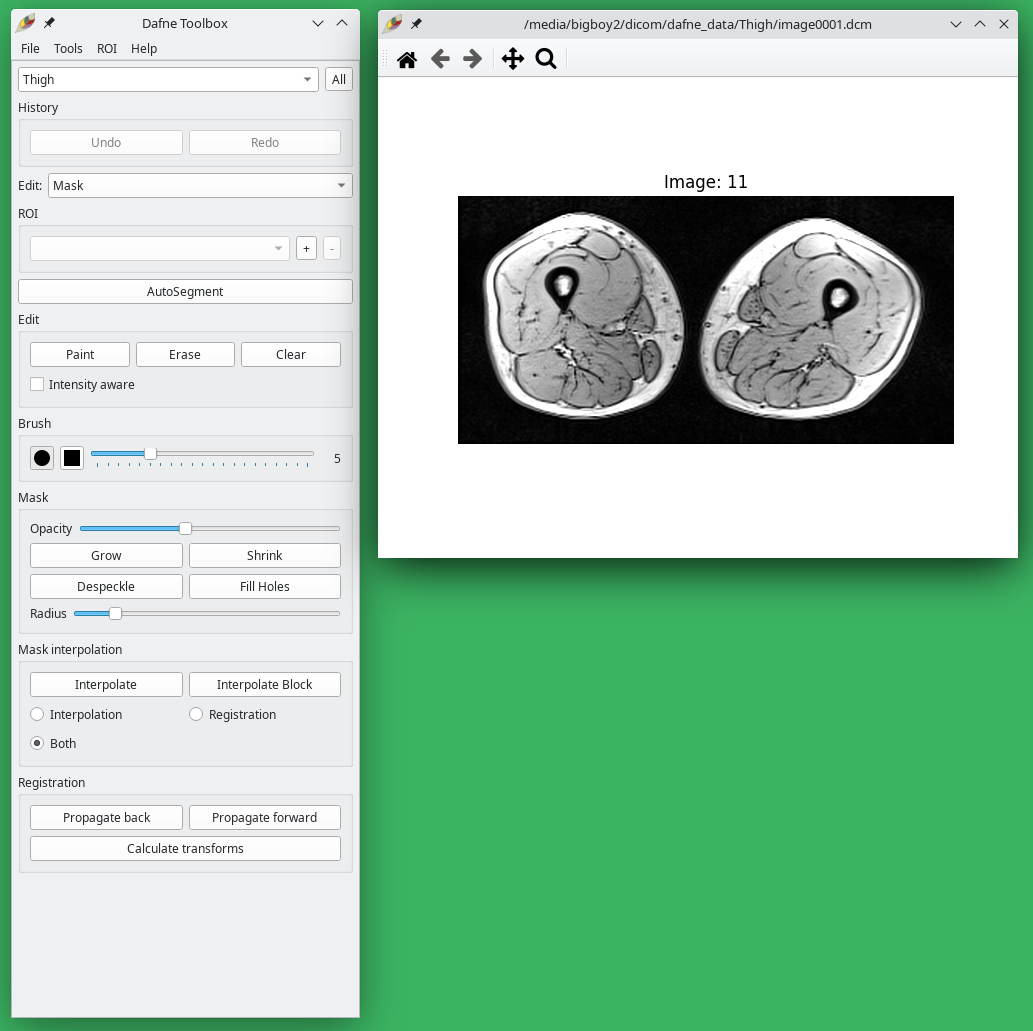
Image loading and viewing
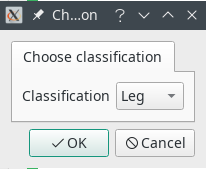
Open a dataset from the menu File -> Load data… To open a DICOM dataset, navigate to the folder and click on any dicom file. The entire folder will be loaded. After selecting a dataset, a popup window will ask to choose the classification for this dataset, which will determine which deep learning model to use for the automatic segmentation. If no appropriate deep learning model is available, choose None. You will be able to change this afterwards, also on a per-slice basis.
Once the dataset is open, window the image by using the right mouse button. You can scroll through the images with the scroll wheel or with the arrow keys.
Use the buttons Pan and Zoom in the interface to adjust the magnification.

Deep learning
The main feature of Dafne is the possibility of doing automatic segmentation using deep learning models.
Dafne uses incremental learning and federated learning to continuously adapt the models to the need of our users. This means that when you perform a segmentation, initially it will not be perfect. You will then have the chance to refine it. When you are satisfied with your dataset, you will export your ROI masks (see below). During this export procedure, the software automatically learns from your refined segmentation and sends the updated model back to our servers. This is why the export procedure takes some time. We will automatically integrate your updated model with the models of our other users, so you will always receive the most accurate predictor. You can also manually perform the incremental learning from the Tools menu (see below)
It is important to say that your data never leave your computer (unless you explicitly want to), so you don’t have to worry about privacy and data safety.
In order to use the deep learning models, you will have to obtain a personalized API key that gives you access to the server. See the “Get Dafne” page to obtain it. Once you have the key, you will have to open the preferences (from Tools->Preferences…) and set the relevant parameters: model location to Remote and your API key in the provided space.
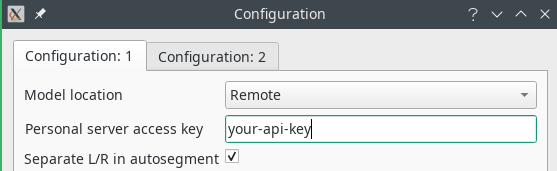
Another relevant setting is the checkbox “Separate L/R in autosegment”. When checked, the left and right limb will generate different ROIs; otherwise, the same muscle on the two different sides will belong to the same ROI.
More deep learning models and the model browser
See all the available models in the Model Zoo. By default, the Thigh and Leg models are activated.
We are expanding Dafne capabilities with additional models. These models are not enabled by default in Dafne, but are accessible from the server. You can see which models are available by using the Model browser, accessible from the Tools menu.
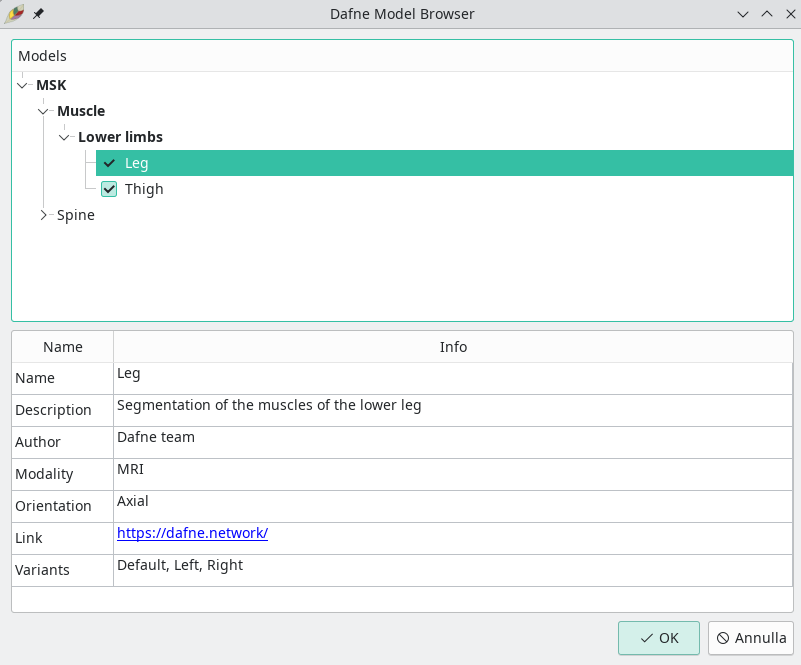
In this window, you can see which models are available on the server, details of these models, and you can enable them in the interface.
Restricting the segmentation area
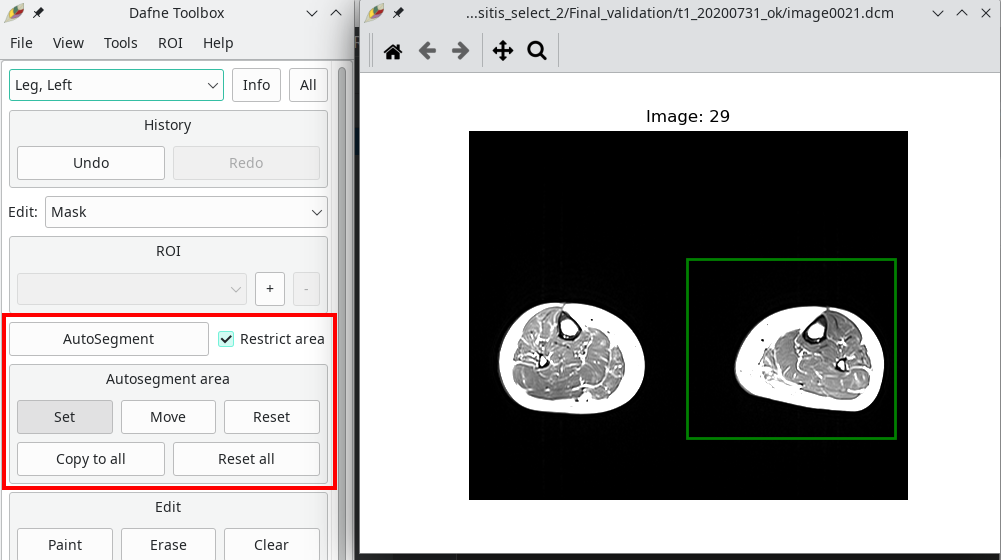
Sometimes, it is beneficial to only run the automatic segmentation on a portion of the image, for example if only one limb needs to be segmented, or if a specific model needs to be run on a portion of the anatomy. To achieve this, you can select Restrict area next to the autosegment button. A green box will appear on the images, which can be set or moved, and the model will only be applied to that area. Remember that every slice has its own restriction box!
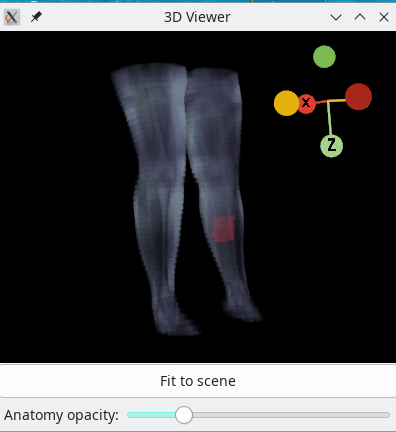
3D viewer
A 3D viewer is built into Dafne to see the placement of the ROI with respect to the overall anatomy. It represents the active ROI, and it is accessible through the View menu.
The toolbox
The tools available in Dafne are displayed in the Segmentation Toolbox window. This window changes according to the current edit mode (mask mode and contour mode, which we’ll see in a moment). However, there is some common functionality to the two modes, which we can see in this image.

The top box shows the classification of the current slice. It can be changed by simply changing the content of the dropdown box. The button “All” sets the classification for all the slices in the dataset.
The ROI box shows the currently active ROI, with a button to add a new ROI and another to delete the current ROI. Beware! Deleting a ROI will delete it from ALL the slices in the dataset!
In contour edit mode, each ROI is divided in subrois, because each ROI mask can be divided into multiple contours. Adding or deleting a subroi will only affect the current slice.
Below the ROI box, the Autosegment button will perform automatic segmentation using the deep learning model (see above). A dialog will open to allow you to perform the segmentation on a set of slices.
At the bottom of the toolbox, there is a registration section (which is only visible if SimpleITK with the SimpleElastix extension is present, see https://simpleelastix.github.io/ or here for precompiled packages). From this section, propagation of the current ROI to the next/previous slice is performed, by means of nonrigid registration. Calculating the registration across the slices can be time consuming, but the registration information is stored automatically in your image folder (in a file named transforms.p), so subsequent operations will be faster. We suggest you use Calculate transforms to precalculate the transforms for the whole dataset. It will take some time, but it will speed up subsequent operations. Please notice that you will not be able to interact with Dafne while the calculation is in progress. As an alternative, you can use the offline transform calculator, also provided with Dafne and accessible either from the menu, or as a separate program (see below).
Edit modes
Dafne has two edit modes to modify ROIs: the mask mode and the contour mode. In the mask mode, you can “paint” on the image with a brush, whereas in contour mode you can define a contour through control points. We suggest the use of mask mode to refine autosegmented datasets, and contour mode to define new ROIs; however, different options are available in different modes. You can easily switch from one mode to the other in the segmentation toolbox.
Mask edit mode
In mask edit mode, you can paint on your image as you would in an image editing program like Photoshop. The active ROI is shown in red, while non-active ones are shown in blue. If you right-click on the image, the ROIs disappear so you can better see the boundaries (all these settings are customizable in the preferences).

Clicking on Paint or Erase allows you to add or remove bits to the current ROI. By selecting Intensity aware, the brush will only paint over or erase voxels whose intensity is close to the central voxel where you initially started painting.
The Brush shape and size determines how the painting is done. You will see a patch of color where the mouse pointer is to show the portion of the image that will be affected. In Erase mode, a checkbox allows you to affect all the ROIs in the image, for example to remove spurious elements outside the overall region of interest. Note: if the patch is not visible, make sure that a) paint or erase are selected b) you are not in zoom/pan mode c) the image window is active by clicking on it.
As a shorthand for paint/erase, you can hold your shift or control button respectively.
Lastly, you can also grow or shrink the mask, or remove small areas or holes by clicking on the appropriate buttons on the toolbox.
You can change the opacity of the masks on the fly with the “Opacity” slider.
Contour edit mode
In contour edit mode, you can draw contours by defining handle points, and the software will interpolate between them. This is useful for accurately defining borders of new ROIs. In this mode, the same ROI may have different subROIs. This means that the different closed contours will then be merged to calculate the mask. When contours overlap, the difference is taken (technically, it’s a XOR operation). The active subroi is depicted in red, other subrois belonging to the same ROI (which will be merged) are depicted in yellow, and other ROIs are depicted in blue.

The small red circles are the handles of the contour. Similarly to paint and erase in mask mode, Add/Move and Remove modify the handles accordingly. Clear removes all the handles from the current subroi (while leaving the subroi acitve). Conversely the - button next to the subroi menu deletes the subroi altogether.
The Translate mode allows moving the whole contour, while Rotate allows rotation around the center of mass.
Mask interpolation and registration
The bottom part of the toolbar is dedicated to mask interpolation and propagation through registration.
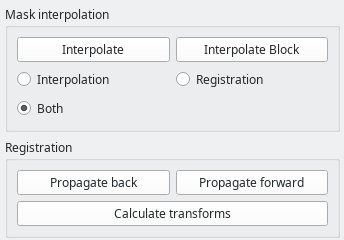
The Interpolate button generates a mask or contour for the current slice based on slices segmentad above and below. Note: this only works for the currently selected ROI.
Either simple linear interpolation of the contour, registration-based interpolation, or a combination of both can be selected.
The Interpolate block button will apply the desired interpolation to all slices between two already-segmented slices.
In the Registration group, forward and backward propagation based on nonrigid cross-slice registration is implemented. For simplicity, the shortcuts n for forward propagation, and b for backward propagation can be used.
In case you want to use registration-based features, it is very much recommended to precalculate the transforms between the slices, either by using the Calculate transforms button, or, asynchronously, with the transform calculator (see below).
Mask refinement with SAM (Segment Anything Model)
The Segment Anything Model, developed at Facebook, is incorporated into Dafne and can be accessed from the “SAM Autorefine” button. It will attempt to guess a better segmentation for the current mask. The behavior of SAM can be controlled from the configuration. One setting is the SAM Bounding box expansion factor, which controls how much the current mask is allowed to expand, at most.
As the model is large, the usage of a NVidia GPU is recommended. However, this is in competition with the automatic segmentation models that are included in Dafne. In order to use both functionality, it is recommended to have one run on the CPU, and the other on the GPU. This can be controlled by the approriate dropdown option in the preferences. Usually, the greatest improvement is seen when using SAM from the GPU; however, it depends on your actual usage.
Both models can in principle be run on the GPU; however, this requires a large amount of GPU memory available (more than 6GB), and it requires limiting the amount available for the Tensorflow autosegment models. Adjust the slider in the configuration until you find a combination that is stable on your machine.

Menus
Dafne has three main menus: the File menu, the Tools menu, and the ROI menu.
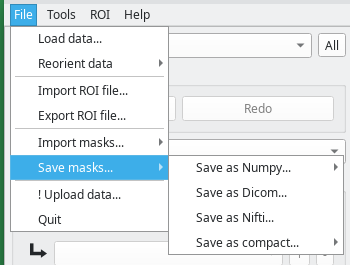
The File menu
This menu contains the input/output options.
- Load data will load a new dataset. Currently, Dicom, Nifti, and Numpy formats are supported.
- Reorient data will reorient the loaded dataset along a different axis.
- Import/Export ROI file will load or save ROI information in an internal Dafne format (with extension
.p). A ROI file can only be used with the same dataset used for its creation or with an identical dataset (in terms of size and orientation). This is in contrast to the mask import (see below) Note that Dafne will periodically save files in this format in the data directory. Make sure to clean the directory periodically, as they can grow large. - Import masks will import binary masks from dicom or numpy files. If the imported masks are DICOM, the software will attempt to align the dataset with the currently loaded one, so it is a way to transfer ROIs across different acquisitions. It might take some time especially if the currently loaded dataset is a 2D multislice dataset. When loading multiple masks saved as DICOM, you can choose the Import multiple masks functionality. You can then select the folder containing all the ROI subfolders and they will be loaded at the same time. This is much more efficient than loading a single ROI one by one.
- Save masks will export the ROIs to disk, in numpy or DICOM format. In case of DICOM format, the same dicom headers of the loaded dataset will be used, and new folders with ROI names will be created. Note: this is a very important operation, because the model learns every time masks are exported. Without exporting masks, no model improvement is performed. This is also the reason why this operation takes some time (depending on the performance of your computer). The masks can also be saved in compact format, which means that all the labels are compacted into a single image and each gray level corresponds to a label. Together with the exported dataset, a legend file in CSV format will be saved. This file is also important (with the correct naming) to import the labels.
- Upload data will send the current loaded data with the ROI information to our servers. !!Use with extreme care!! You don’t need to send your data to us, but you might wish to do so to help us improve the program. Make sure that you have the right to do so! We take no responsibility for any breach of local regulations that you might incur.
The Tools menu
In the tools menu, statistics calculation and the preference editor are located.
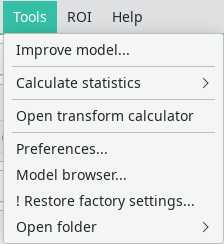
-
Improve model will perform an automatic model improvement step using the already-segmented data, so that subsequent segmentations are more accurate. A minimum of 5 slices are required for this step to work.
-
Calculate statistics will produce a csv (tabular) data file with some statistics regarding the drawn ROIs. What is saved is:
- The ROI name
- The number of slices in which the ROI is defined
- The total number of voxels in the ROI
- The average value of the image in the ROI
- The standard deviation
- The 0th percentile (minimum value)
- The 25th percentile
- The 50th percentile (median)
- The 75th percentile
- The 100th percentile (maximum)

-
PyRadiomics will produce a csv file with texture analysis features from the Pyradiomics package (if available).
-
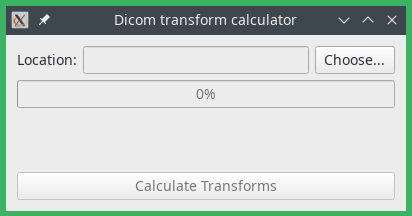
Open transform calculator will open a tool that allows an offline calculation of the nonrigid transforms between slices, in order to speed up subsequent propagation operations. A screenshot of the tool is shown below. Select a folder with DICOM files and click on “Calculate transforms” to start the calculation. The transforms will be stored at the end in an internal Dafne format, in the same folder as the dicom files. For performance reasons, we suggest you to start this tool directly as a separate executable (
calc_transforms.pyin the source installation, orcalc_transforms.exein the windows compiled installation)
- Preferences will open the preference editor.
- Restore factory settings will restore the default Dafne preferences.
The ROI menu
This menu allows some operations on ROIs.
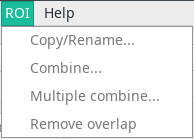
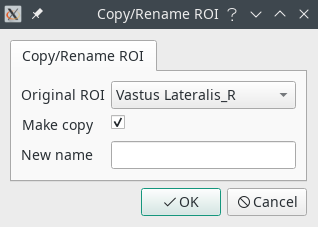
- Copy/Rename will make a copy of a ROI, or change its name. A copy is performed unless the Make copy checkbox is unchecked.
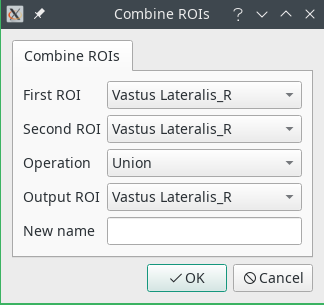
- Combine will perform boolean operations over two ROIs. The output ROI will be replaced with the result of the operation. If you wish to create a new ROI, select Specify a different name in the
Output ROIfield and write the name in the text box. The available operations are:- Union: The two ROIs are combined (OR)
- Subtraction: The second ROI is subtracted from the first (AND NOT)
- Intersection: The common area between two ROIs is retained (AND)
- Exclusion: The non-overlapping portions of the two ROIs are retained (XOR)
-
Multiple combine allows boolean operations on multiple ROIs at the same time.
-
Remove overlap will remove the overlap between the current ROI and the others by deleting the overlapping areas of the other ROIs. It is useful when correcting misassignment of areas of the image to the wrong ROI.
Keyboard shortcuts
Some keyboard shortcuts are available for convenience.
| Command | Key(s) |
|---|---|
| Previous Image | [Left Arrow], [Up Arrow] |
| Next Image | [Right Arrow], [Down Arrow] |
| Paint/Add/Move | [Shift] |
| Erase/Delete | [Ctrl/Cmd] |
| Propagate Forward | n |
| Propagate Back | b |
| Reduce Brush Size | -, y, z, [Ctrl/Cmd]+[Scroll Down] |
| Increase Brush Size | +, x, [Ctrl/Cmd]+[Scroll Up] |
| Remove ROI Overlap | r |
| Undo | [Ctrl]+z |
| Redo | [Ctrl]+y |
| Go to image | [Ctrl]+g |
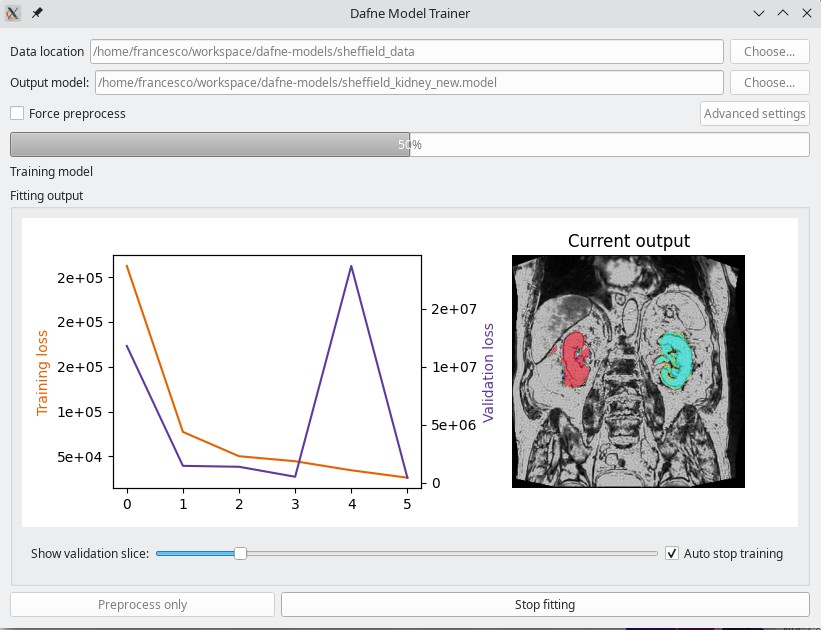
Model trainer
As a companion to Dafne, a simple application that can train a new deep learning model is provided for download from the Dafne models release page or through pip.
pip install dafne-models
create_model_ui
The model needs as input a folder containing datasets and ground truth in the form of “Numpy bundles” as saved from Dafne. You can find a video on how to use it in the Tutorials page.
Bug reporting and troubleshooting
Please report bugs on Github or through the contact page of the site.
When reporting a bug, please include the log files called dafne_output.log and dafne_error.log (make sure that no sensitive information is contained inside!). The log files can be found at the following locations (replace <user> with your user name):
- Windows:
C:\Users\<user>\AppData\Local\Dafne-imaging\Dafne\Logs - Mac:
/Users/<user>/Library/Logs/Dafne/ - Linux:
/home/<user>/.cache/Dafne/Log/